
Introduction
Cascading Style Sheets (CSS) is a language developed in the mid-90s with the goal of styling web pages, currently maintained by the World Wide Web Consortium's CSS Working Group.
For the first decade or so of the language's existence its scope and mission-statement were fairly straightforward: web pages are made up of images, paragraphs, videos, etc. that need to be positioned and sized accordingly. In 2007 however, Apple's representatives in the Working Group put forward a wishlist of features that the company wanted to see incoporated into the language. These included 3 incredibly powerful tools for creating design-complex pages (all of which incidentally are used on this site's homepage):
- 2D and 3D transformations - translations, rotations, and skews performed in either 2 or 3 dimensions
- Animations and transitions - event-triggered or "ambient" animations, e.g. the fill effect I use on links. Can include transformations, allowing for dynamic 3D effects
- Filter effects - blurring and hue-shifting images, drop-shadows, etc.
I only found out that 3D animations were possible in CSS around last October, and my initial reactions to this revelation were
- "Wow! That's really cool."
- "Wait, then what's the point of <canvas>?"
These features are neat and all, but they weren't even new to the web when this was first proposed - it's that this used to be primarily handled by JavaScript libraries. Additionally, when I've shown people the demos I've made using pure CSS, their reaction always carries a feeling of "CSS? Really?" - a slight bafflement, a sense that putting this functionality in CSS is somehow unintuitive. Anyone familiar with the language will know that "intuitive" has never been an accurate descriptor for any aspect of CSS, but still.
The reason why these features are in the language is simple: Apple asked for them, and a lot of the group thought they were nifty. There was also some discussion on CSS not wanting to become irrelevant as other technologies began to fulfill demands for presenting web content. As for why Apple specifically was the one to call for these, it's hard to tell. As an aside, I recommend reading one Apple representative's hilariously shady and unprofessional response to a Microsoft employee questioning if these features were really appropriate. It brought me joy.
Appropriate or not, in this article I want to explore not only what you can do with these features, but also have a closer look at what the designs of their implementations ended up being.
CSS crash course
As some of you reading this may not have worked with CSS before or perhaps need a refresher, here's a brief run-down of how CSS works. Fundamentally, a CSS document is a list of rules that take the following structure:
selector {
    property: value;
    other-property: other-value;
    ...
}
Where selector is some string specifying which parts of a web page to apply that styling rule to. For a concrete example of these in action, the following is a complete CSS document that makes all paragraphs of the page it is applied to be white text on a purple background:
p {
    color: white;
    background-color: purple;
}
This is a paragraph.
Animations and transitions
Often when styling web pages, you want to be able to change the presentation of content depending on how the user interacts with it. For example, when the user hovers over a button you might want it to glow slightly, or perhaps when they click on an image you might want it to smoothly move to the center of the screen and expand. Transitions in CSS allow us to define exactly those kinds of changes in styling.
button {
    border: 1px solid black;
    transition: all 0.5s ease-in-out;
}
button:hover {
    filter: drop-shadow(0em 0em 0.5em pink);
    border-color: pink;
}
em here is a unit of length based on font size.
In order to create the above, I have declared two sets of rules - one is applied to the button in its "default" mode, and the other is applied only when the button is hovered over by the user. Note that rules from the first set still apply to the button when hovering as long as those rules are not overwritten by the second set - declarations are said to "cascade" in this way.
When the button is hovered over, the first rules define the start of the transition and the second the end goal. With the transition keyword, I define which properties are included in my transition ("all" for convenience), how long I want the whole transition to take, and a timing function that helps me control the feel of the final result. Compare the above with changing the timing function to linear:
The difference is subtle, but the eased function has a bounce to it that is missing in the linear one; the linear function feels sluggish in comparison.
Transitions define how content moves from one styling to another due to some interaction with the user - an explicit trigger. An animation is very similar, except it is not triggered by something the user does - it just happens on its own. In lieu of triggers, CSS introduces a system for writing animation keyframes. For example, let's take the glowing button from earlier and make it pulse eerily in the background while the user is not hovering over it.
.pulsebutton {
    animation: pulse 0.75s alternate infinite;
}
@keyframes pulse {
    to {
        color: pink;
        border-color: pink;
    }
}
.pulsebutton:hover {
    animation-play-state: paused;
}
In the above rule for the pulsebutton class, we are saying that we will play the pulse animation back-and-forth forever, with each forward pass and each backward pass taking 0.75 seconds. The to keyword signals the rules for the end state of the animation, but I could also have used percentages if I wanted some rules to apply at specific points.
In terms of the designs of these features, I actually really like them. The examples I've shown have been simple, but I think it's not too hard to see how you could build these up to create a truly dynamic and impressive design for a website. It's far from perfect, of course. Having to remember what order keywords go in for the animation rule is always a pain - a product of it being a shorthand for many other rules like animation-timing-function; I'm disappointed that you can't define transitions through the powerful keyframes syntax; and trying to transition features of an element that already have an animation applied to them just doesn't work right. Overall though, solid 8/10.
2D and 3D transformations
This is where things start to get wild.
So 2D transformations are pretty straightforward - you have an object, and you want to move it around a bit. To see this in action, let's set up a box that we can move around. First, let's twist it 45 degrees to the right, then move it.
#box {
    animation: move 2s infinite;
}
@keyframes move {
    50% {
        transform: rotate(45deg);
    }
    100% {
        transform: translate(2em, 3em) rotate(45deg);
    }
}
Notice that we have to specify the rotation in both keyframes - at each point you have to describe the entire value of any property that you change. If we didn't, then the box would untwist as it moved down.
However, this is HTML - we can put things in these boxes. Consider the same animation, but this time we'll put some text in the box. Notice that it's still treated as text that you can highlight, copy, edit, etc.
Try selecting me!
2D is pretty cool and all, but if it's not enough for Apple then it's not enough for us! Let's see how we can take it further.
3D transformations
In all fairness, there's not as much jank afoot here in the design as there could have been. With that being said, 3D in CSS takes some getting used to.
Defining distance in the x-axis and y-axis is pretty easy on a web page - you just use the dimensions of the computer screen. For 3D however, we'll need to introduce the z-axis, which will correspond to how far away elements appear to the user. Now we don't actually know how far away the user is from their screen, but chances are it'll be about arm's length, so we'll set the perspective value to be around that distance. perspective essentially positions the viewer in 3D space, specifically by giving the z value of their position. Elements that have been moved forwards on the z-axis appear closer, and those moved back appear more distant. As for specifying the x and y values of the viewer's position, that's where perspective-origin comes into play. Why not just set all of them with one keyword? Because.
To illustrate the role of perspective, let's make the same 3D animation 3 times, each version having its own value.
container {
    perspective: XXX;
    perspective-origin: top center;
}

.pbox1, .pbox2, .pbox3 {
    position: absolute;
    animation: pslide 2s linear infinite alternate;
}
.pbox1 {
    transform: translateZ(-5em);
}
.pbox3 {
    transform: translateZ(5em);
}
@keyframes pslide {
    from {
        left: 10%; /* We'll adjust the left margin of each element to make it move */
    }
    to {
        left: calc(90% - 5em); /* 5em being our box width */
    }
}
perspective: 400px perspective: 800px perspective: 1200px Without having to do any math of our own, we can create this really slick parallax effect using pure CSS. I think that's cool. And just as we had translations and rotations in 2D, we have them in 3D as well.
box {
    animation: rotate 2s linear infinite
}
@keyframes rotate {
    to {
        transform: rotateY(360deg);
    }
}
But these are still HTML elements, so we can put whatever we want in them:
Try selecting me!
Now I can't speak for everyone, but that text on a rotating box is fairly annoying to read. While it is certainly intriguing to consider the potential of what you can accomplish using purely CSS, we can't forget that the point of this language is to make web content more accessible and pleasing to consume. In a practical sense the use-cases for making the text spin are extremely limited, which again calls into question whether all this is really necessary for the language.
Ignoring practicality for now, let's explore the possibilites of what we can do. We know that we can make flat rectangles and call them boxes, but what about actual boxes? A cube is made up of 6 squares, so if we just draw 6 boxes and adjust accordingly, we should get something good.
box1 {
    transform: translateZ(2.5em);
}
box2 {
    transform: translateZ(-2.5em);
}
box3 {
    transform: translateY(2.5em) rotateX(90deg);
}
...
Well, it took a lot of positioning and little bit of work to get it right, but you can indeed make actual boxes! It's kinda hard to see things properly without an animation, so let's make it rotate. Now we could animate each element individually, but that would require writing a separate set of keyframes and rules for each of the 6 faces. A better option would be to place the entire set of faces into some kind of holder element and animate that holder instead - much less code, and a lot easier to adjust the look of. Let's try it:
holder {
    animation: rotate 7s linear infinite;
}
@keyframes rotate {
    to {
        transform: rotateZ(360deg) rotateY(360deg);
    }
}
Wait, where did all the boxes go? You can only see one of them, but they're all still part of the file, and I didn't delete any of their transformations.
Unfortunately, this is where jank enters stage left. If you try to rotate any HTML element in 3D, the default behaviour in CSS is to flatten everything within that element - the 3D effects applied to the faces contained in our holder are effectively nullified. They aren't entirely gone, but they've been squished back into 2 dimensions which in our case ruins the effect. There is a way to rectify this issue - if we specify transform-style: preserve-3d in our holder element, then the effects applied to the faces within are not altered. Behold:
holder {
    animation: rotate 7s linear infinite;
    transform-style: preserve-3d;
}
While it's nice that you get to choose the behaviour of CSS on transforming nested elements, it is strange that the default is to flatten everything - surely keeping everything 3D should be the base case? I feel like if the user has asked for a 3D transformation, then implicitly they are also asking for it to remain 3D. On top of that, all the demos I have seen of complex 3D CSS specify this rule. Much like how people refer to "static" in Java as "the word you throw around to make the errors go away", transform-style: preserve-3d feels very much the equivalent in 3D CSS. It's not always easy to understand when it needs to be applied ("wait, it doesn't propagate to child elements?"), and it feels like something that language should just do for you. The difference is, "static" in Java is intuitive once you hear the explanation.
In any case, we now know we can faithfully model any shape that can be broken down into boxes, and because we can set the background images of these boxes to be any flat shape we can build more complex models out of triangles too - any shape with flat faces can now be perfectly constructed. What about curves? Well, as far as I've seen it is not possible to properly construct any kind of curved surface in CSS. The best we can do is approximate them with some number of flat segments, the more segments used the higher the quality of the approximation. For example, let's try to model a smooth ring:
It gets pretty smooth as the number of sides increase, but I'm noticing some uncomfortable gapping between the boxes - a bit of untidy math goes into figuring out what the width of each box should be, and it seems like decimals getting cut off by CSS leads to occasional pixel-wide slits. With garish enough colours no-one will notice, but it's not ideal. Brief aside: I showed the above demo to one of my lecturers, and she responded that I would have been great at designing websites in the 90s. I'm still recovering from that burn.
To round off this section, I'd like to talk about stars a bit. Stars were one of the first things I tried to make when I learned Python and turtle graphics at school, and I was surprised by how complex they got. We all know the simple 5-pointed pentagram star, as well as the 6-pointed Star of David, but you can actually make stars with any number of points. What's more, you can change the character of the star by adjusting how many points are between the endpoints of any line in the star. We can generalise this using Schläfli notation - the pentagram is {5/2}, as it is a 5-pointed star and to draw a line from one point you count 2 points along to the other. This is messy to explain in words, so why not an interactive demo:
Some Firefox-specific jank
Overall, the design of these features is pretty solid. It's expressive and powerful, and while the wholetransform-style: preserve-3d thing is slightly embarrassing, the ability to apply 3D animations to nested elements with their own animations is incredibly useful.
Be that as it may, there are still some rendering quirks that I take issue with. Depending on the resolution of your screen and the browser you use, you may have noticed that the edge of a box becomes somewhat jagged as it rotates - pay attention to the top and bottom edges of our example from before:
Note that this behaviour is visible on Firefox but not on Chrome or Edge, and it may not even be visible on your version of Firefox. This is largely due to different browsers using different rendering engines for CSS. For reference, below is a screenshot of what appears for me.
What's going on here is called spatial aliasing. The box's top line has that slight slant which causes it to intersect pixels to various degrees. It seems that in the logic of Firefox's rendering engine a pixel can only be filled or unfilled, so there's an uncomfortable jump where the renderer decides that a pixel is sufficiently covered to be filled, leading to our jagged edge. What the other engines do is known as anti-aliasing. Instead of a pixel being completely filled or empty, it can be filled to various degrees by adjusting the intensity of its colour. Up close this makes edges look fuzzy and pixellated, but at small scales this leads to a very smooth finish. For an example, let's consider a case where Firefox applies this same technique too eagerly: a dot, translated forwards:
And once more, a screenshot of how this renders on my browser:
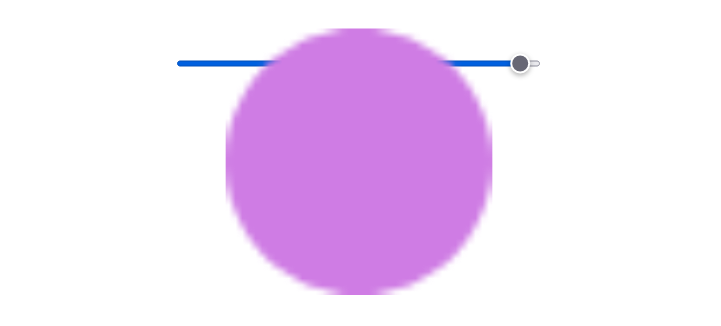
We're getting this fuzzy edge even though logically it's just meant to be a circle! If I asked CSS to draw a circle that big without any transformations, there would be no visible anti-aliasing on it whatsoever and the edges would be smooth and crisp. Instead, we get something that should be a clean render but is actually quite messy. The edges of the dot show strange pseudo-pixels - pixel boundaries that are not there anymore at larger sizes. What I imagine happened is that the dot was rendered at a small size with an approprate amount of anti-aliasing for that scale, then was simply blown up to match the perspective. There's no recalculation of what the circle's edges should look like for the anti-aliasing, which is what makes these two examples particularly egregious in my mind: their behaviour is the reverse of what I want it be! The slant of the box's edge is recalculated but not anti-aliased, and the curve of the dot is anti-aliased but not recalculated.
Filters
Lastly, I'd like to touch on the filters module in CSS. While not yet an official recommendation of the CSS Working Group (read: CSS-wide feature), it does have pretty good cross-browser compatibility. The syntax for applying a filter to an element is very simple - filter: function(value). For example, if I wanted to invert the colours of this image three-quarters of the way, and then put a red drop-shadow on the whole thing, I could do it like so:
img {
    filter: invert(75%) drop-shadow(0.5em 0.5em 3px red);
}
While you are limited to the handful or so of predefined functions built-in to this feature, there is support planned for users to reference their own filter effects from SVG files.
Now while there's nothing too crazy going on here, I wouldn't be discussing this feature if there wasn't something about the design that vexed me. In the function used for defining drop-shadows, arguments are listed with spaces as separators. In (nearly) every other function in CSS, including functions used previously in this article, arguments must be separated by commas. These two systems are not interchangeable, and forgetting which one a function uses will cause the rule to be ignored by the browser. This one little inconsistency for me speaks to a much larger issue within the design of CSS.
After the release of CSS2, the language stopped being developed as a single project and instead split in several separate modules, with the intent that they could progress and innovate at their own rates (hence the siphonophore banner image). However I do not believe that this has been beneficial to the state of the language as a whole because it has hurt CSS's design process. The modular organisation makes cross-module design regularisation more difficult, and the example design incoherency seems to have been a product of this. drop-shadow had originally been proposed to function like box-shadow and be its own keyword (keyword values not needing commas), but when it got folded into the filters module it just kept that old syntax. No-one ever noticed because the spec only has 3 authors - not a lot of people ever had eyes on the design as it wasn't a module they were responsible for. Frustratingly, when drop-shadow was first suggested to be implemented as a filter they even discussed it with the more consistent syntax, but it just never carried through.
Final thoughts
We've just scratched the surface of not only what you can do with CSS but also the many design flaws of the language. The CSS Working Group is not blind to these problems, but unfortunately once websites start widely using a feature it has to become fossilised so as not to break anything, well-designed or not. They are in the unenviable position of having to design a product used by everyone everywhere that keeps getting more and more complex due to market pressures.
Something interesting to note is where these features are actually used. Filters and drop-shadows are used all over the place, transition-on-hover effects too, but what about 3D? I've played around with it a bit myself, and in my opinion it's very hard to pull off without it looking tacky. Because of that I think it's easier to create finessed layouts that don't rely on 3D, and with rendering inconsistencies across browsers it's even harder to get a pleasing result if you do use it. Taking a look at some of the most-trafficked sites online, I can't actually find any 3D effects being used.
Personally, I think the greatest potential of 3D and other lesser-used features in CSS is not in presenting web content but in creating art. To that end, I am putting together a collection of demos to explore this potential here, which I will add to over time. I hope you enjoy what I come up with, and that it inspires you to create your own art with the tools available in CSS.
All images are my own.
Thank you for reading!